Game Design Path
Everything is magic until you understand it - same with loading info from files
In the previous guide, we looked at what the maps are made up of and how to edit them using the map editor. We also encountered a few topics that were not covered.
Don’t worry, we’ll take care of it all in this guide *:..。o○( ͡° ͜ʖ ͡°)○o。..:*
The first thing we will look at is how the game reads tiles and maps from their files.
Open Tile.java. What do you see?
It’s just a small class that contains the same properties we saw in the tileset file as member variables. No information loading takes place here though, it just takes all the values as parameters in the constructor. What the tile class does do is load an image given the tile image file name and scale it to TILE_SIZE x TILE_SIZE pixels.
You can also find that store type and info strings, but don’t even have getters for them.
That’s because they are not used anywhere in the game code.
But if you wanted to make something such as tiles poisonous to the player, or ones possible to fall through, or quicksand that slowly drowns the player, you might want to make use of them.
For now, let’s get back to seeing how they’re loaded - go ahead and open Tileset.java.
This class has only one member variable, which is a hashmap of integer and tile pairs.
The constructor looks like this:
public Tileset() {
    tiles = new HashMap<>();
    tiles.put(0, null);
    loadTilesFromDisk();
}
First, it creates a new empty hashmap object.
Then it puts a new element into it - a tuple with 0 as the integer and null as the Tile object. This is to represent the empty tile - it has ID of 0 and no real properties, so it doesn’t need a dedicated tile object at all.
Afterward, the rest of the tiles are loaded in the loadTilesFromDisk function.
Let’s take a look, what does this function do?
public void loadTilesFromDisk() {
    // Load the tileset file
    InputStream is = getClass().getResourceAsStream(Settings.tileset);
    BufferedReader reader = new BufferedReader(new InputStreamReader(is));

    String line = null;
    String[] tileProperties;
    try {
        // Read the tileset file line-by-line
        while ((line = reader.readLine()) != null) {
            // Ignore lines beginning with # - they are comments
            if (line.charAt(0) == '#')
                continue;

            // Each tile has 5 comma-separated properties (some empty)
            // 1. The tile number (maps refer to this)
            // 2. Tile image file name
            // 3. Tile name
            // 4. Tile type
            // 5. Any extended info / comments
            tileProperties = line.split(", ", 5);
            addTile(Integer.parseInt(tileProperties[0]),
                                        tileProperties[1],
                                        tileProperties[2],
                                        tileProperties[3],
                                        tileProperties[4]);
        }

        reader.close();
        is.close();
    } catch (IOException e) {
        e.printStackTrace();
    }
}
First, it loads the tileset file (the filename is specified in the Settings class). Then it reads this file line by line, skipping all the lines that begin with a ‘#’.
For all the lines that contain tile information, the line is split up into 5 parts on every comma.
Then the addTile function is called with the 5 parts as separate arguments.
As we already saw, the Tile constructor takes care of loading the tile image for each new tile.
Once all the tiles have been loaded, the file is closed.
Understanding these details is not absolutely crucial to the game functionality, but it should give you an insight into how the tiles work in the game.
The world is in your hands - at least this game world is

Now, let’s see how the maps themselves are loaded.
For this, you will want to open World.java.
The World class represents the current state of the game and there is only one, regardless of how many levels there are.
The world instance is created in the constructor in GameManager.java.
Take a sneak peek if you wish, I won’t tell anyone ;)
When a world is created, its constructor creates a new tileset instance, which loads all the tiles from its own constructor.
While in theory, different maps could have different tilesets - this part of the code disregards that. Perhaps this is something you might want to change? In most cases it will be easier to just use one massive tileset for all maps though (and more efficient!)
The world class has only one function - loadLevel.
Let’s investigate - how does it work?
It takes int level as a parameter - this is just the level number; the first level’s number is 1, I’m sure the pattern onwards is quite clear.
The first lines that run are these:
// Load a new background image for the level
try {
    backgroundImage = ImageIO.read(getClass().getResource(Settings.levelBackgroundImage(level)));
} catch (IOException e) {
    e.printStackTrace();
}
The first thing that happens here is Settings.levelBackgroundImage(level) gets called.
What does this function do? Let’s take a look in Settings.java:
public static String levelBackgroundImage(int level) {
    return ("/images/background" + String.valueOf(level) + ".png");
}
This function simply returns a string such as “/images/background1.png” or “/images/background2.png” with the level number in it. What’s neat about having it here is that if you decided to change the naming format, or to move these images somewhere, all you need to change is this function.
The rest of the code in loadLevel loads the actual image from a file with this name.
What happens next?
// Open the level map data files
InputStream is = getClass().getResourceAsStream(Settings.levelMap(level));
BufferedReader reader = new BufferedReader(new InputStreamReader(is));
In a very similar fashion, Settings.levelMap(level) gets called first.
In the Settings class you will be able to see that this function looks like this:
public static String levelMap(int level) {
    return ("/levels/level" + String.valueOf(level) + ".txt");
}
It returns a string that might be “/levels/level1.txt” or “/levels/level2.txt” or another depending on the level number.
Then, the file with this name is opened for reading.
The code that proceeds then is this:
String line = null;
try {
    // Read the map file line-by-line
    if ((line = reader.readLine()) != null) {
        // The first line of a level file contains 3 configuration
        // parameters
        // 1. Map width
        // 2. Map height
        // 3. Tileset file name
        String[] config = line.split(" ", 3);

        // Create a new 2D map array with width * height dimensions
        cols = Integer.parseInt(config[0]);
        rows = Integer.parseInt(config[1]);
        map = new Block[rows][cols];

        // Since we are not using multiple tilesets, we ignore the last
        // parameter
    } else {
        throw new Exception("Tried to load level " + level + "but its map file was empty!");
    }
} catch (IOException e) {
    e.printStackTrace();
}
Remember from the previous guide what a map file looked like.
The first line of “level1.txt”, for example, was 20 10 tileset.txt.
The loadLevel code parses the first two numbers as the columns and rows of the map and creates a new 2D array of __Block__s as the map.
The tileset filename is ignored (as the tileset was already loaded when the world was created).
What is this Block class? I urge you to take a look at Block.java!
A Block is basically an instance of a Tile. There are only a handful of Tiles in the Tileset, but there are rows * columns blocks, which contain a reference to a tile each. This way the same image does not need to be loaded 100 times, if there are 100 identical blocks - instead they all point to the same loaded image.
The blocks also have a bounding box, used for collision detection, which is explored in the Game Development pathway.
Let’s not stray too far - what happens next?
// The second line contains colour configuration
// We ignore this and any other lines until the map data completely
// The start of map data is preceded by a line with a single "."
while (!line.equals(".")) {
    line = reader.readLine();
}

// The map data consists of 3 lines, each for a different layer
// The first layer is terrain - blocks that cannot be walked through
// The second layer is objects - things that can be walked through and
// interacted with
// These objects are displayed behind the player
// The third layer is for objects to be displayed in front of the
// player, such as lights

// Currently only processing the first layer, hence z < 1
for (int z = 0; z < 1; z++) {
    line = reader.readLine();

    if (line == null) {
        throw new Exception("The map file for level " + level + " did not contain layer data!");
    } else {
        StringTokenizer tokens = new StringTokenizer(line);

        for (int y = 0; y < rows; y++) {
            for (int x = 0; x < cols; x++) {
                int tileID = Integer.parseInt(tokens.nextToken());

                Tile currentTile;

                try {
                    currentTile = tileset.getTile(tileID);
                } catch (NullPointerException e) {
                    throw new Exception("The map file for level " + level + " references non-existing tile with ID " + tileID);
                }

                map[y][x] = new Block(y, x, currentTile);
            }
        }
    }
}
reader.close();
is.close();
The comments in the code seemingly do the job of this guide - there is not much to add (͠≖ ͜ʖ͠≖)
Maps are made up of layers, just like ogres and onions.

Specifically, each map has 3 layers, but as you can see, the loading code completely ignores the 2 above ones. This is something you might want to consider implementing. A good starting point would be to turning map from 2D into 3D arrays with an element of depth to them. Afterwards the code for drawing maps would have to be adjusted - you’ll have to work with the graphics designer on that one.
Taking a look beneath - how to edit multiple layers
So far, we have only used the map editor to edit the base layer of a map.
Fortunately, you don’t have to resort to changing the map files by hand to change the other ones - the map editor takes care of that too.
Simply select which layer to currently edit in the top toolbar of the map editor:
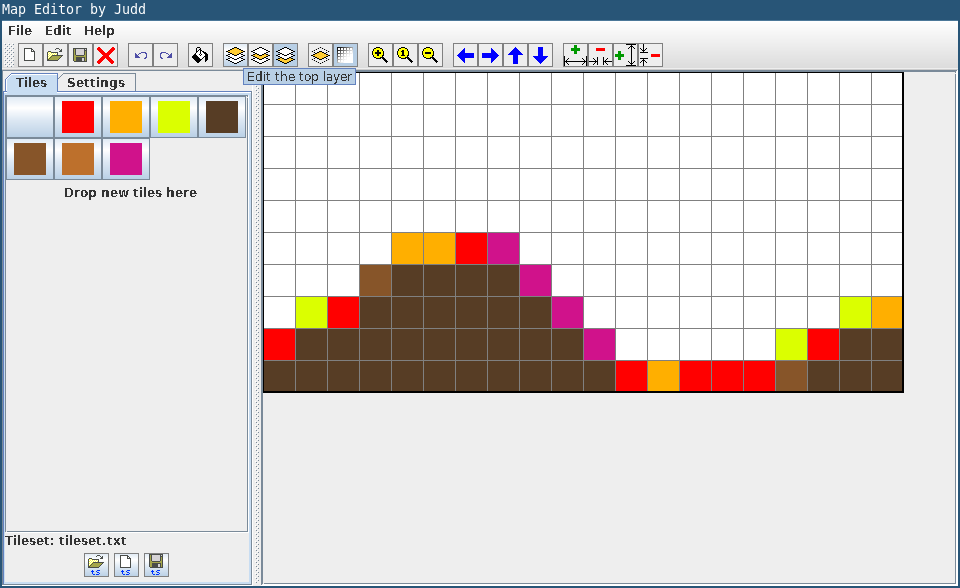
Pro tip: if your map isn’t showing up in the game as you wish it to be, it’s always a good idea to open this map’s file in a text editor and take a look. Quite often this is the result of having edited the wrong layer.
The big picture - about screen sizing and cameras
You will have probably noticed, that even though you can change the size of any level map, the game window stays the same fixed size.
This means that if you make a smaller map, part of the screen will be blank. If you make a bigger map, part of it won’t be shown on screen.
You can tackle this by changing the game window size in Settings.java.
You could also try changing the tile size, but beware that this might mess with collision detection - talk to your game development teammate about that.
The best solution is to create what is called a “camera” that follows the player. This construct will show only a part of the map at a time, such that the character is in view, and move the view as the character moves.
This is a good article that explains more about how a camera works and how you could implement one: Cameras in 2D platformers
Here are some notes that the authors of a 2D platformer called Tiny Thor wrote on the topic: Camera Logic in a 2D Platformer
That’s all for the discussion on world structure in this game, see you on the other side of the portal!
